The cabinets are ready! Our cabinet maker is waiting on us to finish up so that he can do the install!
We decided to start installing the bamboo floor in the Pantry first... as this is our very first time laying hardwood floor.
First we layed down tar paper... then layed the very first pieces..
Next we layed out some pieces to figure out the cuts. After we were happy with the dry fitting, we used the floor nailer to set it in place!
So, 5 more feet to go in the Pantry... then MOVING ON into the Kitchen!
Our House Building Adventure
We bought 3 acres of raw land in Wyoming... started clearing it... dug the basement... poured cement... and started framing!
This blog details our house building adventure... building our new home... ourselves!
Monday, June 21, 2010
Thursday, June 17, 2010
Kitchen painted... bring on the floor!
I put a 2nd coat of Red Red Wine (Olympic brand, no VOC) paint.
Rented the sander today too. We've got to sand the seams on our subfloor.
Tomorrow is a big day for us! We will prepare the subfloor for hardwood bamboo flooring! It's going to be a new experience for us!
Our cabinets are all ready... the cabinet maker is just waiting for us to give the OK for install!
Rented the sander today too. We've got to sand the seams on our subfloor.
Tomorrow is a big day for us! We will prepare the subfloor for hardwood bamboo flooring! It's going to be a new experience for us!
Our cabinets are all ready... the cabinet maker is just waiting for us to give the OK for install!
Friday, June 11, 2010
And now... 2nd coat of Red Red Wine!
Well, we had a family emergency that put us back a bit this week.
I'm gearing up to put the 2nd coat of Red Red Wine on the walls!
Tuesday, June 08, 2010
Color in the kitchen...
It was a bold move to put Red Red Wine on the north wall AND the Breakfast Nook. Many people warned against it...
But, I must say that I ABSOLUTELY adore it! I love this combination of colors!
You can feel the richness... the warmth of these two colors when you walk into the Kitchen.
Today coat # 2 goes on!
Later this week, we lay the natural color bamboo flooring... then later this month the Red Oak stained cabinets will be installed followed by appliances... then soapstone counters and island.
I can't wait to have a functioning kitchen!!!! I've been dreaming of pan seared scallops !
But, I must say that I ABSOLUTELY adore it! I love this combination of colors!
You can feel the richness... the warmth of these two colors when you walk into the Kitchen.
Today coat # 2 goes on!
Later this week, we lay the natural color bamboo flooring... then later this month the Red Oak stained cabinets will be installed followed by appliances... then soapstone counters and island.
I can't wait to have a functioning kitchen!!!! I've been dreaming of pan seared scallops !
Sunday, June 06, 2010
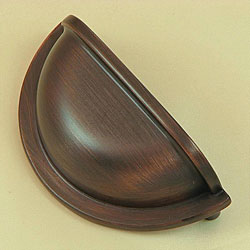
Ordered cabinet knobs/pulls...
After going back and forth between oil-rubbed bronze and satin finish for my Kitchen cabinet knobs and pulls... I have decided to go with the warm color of oil-rubbed bronze.
My kitchen cabinets are stained in Red Oak... a beautiful deep warm brown color. Can't wait to see it all come together!
Oh... last night we pulled out our kitchen/breakfast nook light fixtures... that I ordered last year. I wanted to check the colors with my paint choices... They go PERFECTLY!
My kitchen cabinets are stained in Red Oak... a beautiful deep warm brown color. Can't wait to see it all come together!
Oh... last night we pulled out our kitchen/breakfast nook light fixtures... that I ordered last year. I wanted to check the colors with my paint choices... They go PERFECTLY!
Saturday, June 05, 2010
Adding Color to the Kitchen...
Kitchen Progress
How exciting it is after all these many months of dreaming of my new new kitchen... to finally buy paint and get to it!
After thinking long and hard on a color scheme for my house, I decided to go with the beautiful earthy colors of our incredible Bighorn Canyon. I have always loved these deep rich colors!
So, when I saw Olympic Paint's Audubon collection of paint I fell in love with the colors!

Just finished the 2nd coat of Toffee Crunch in the kitchen ceiling, west, south, and east walls.
Next up is Red Red Wine on the north wall... my accent wall... with the same luscious color all over the breakfast nook! Can't wait... to paint on Monday!!!

My inspiration...
Tuesday & Wednesday will be kitchen flooring days! We'll be laying down our beautiful blonde bamboo!
Then... Thursday... fingers crossed... hoping and praying... CABINET INSTALL!!!
How exciting it is after all these many months of dreaming of my new new kitchen... to finally buy paint and get to it!
After thinking long and hard on a color scheme for my house, I decided to go with the beautiful earthy colors of our incredible Bighorn Canyon. I have always loved these deep rich colors!
So, when I saw Olympic Paint's Audubon collection of paint I fell in love with the colors!
Next up is Red Red Wine on the north wall... my accent wall... with the same luscious color all over the breakfast nook! Can't wait... to paint on Monday!!!
My inspiration...
Tuesday & Wednesday will be kitchen flooring days! We'll be laying down our beautiful blonde bamboo!
Then... Thursday... fingers crossed... hoping and praying... CABINET INSTALL!!!
Friday, June 04, 2010
Finished priming the kitchen...
Rich and I worked together today to finish priming the kitchen and breakfast nook. I decided to use tinted primer... THAT is so the way to go!!!
Here's what we did to get to this point....
1. Primed the walls and ceiling.
2. Textured the walls and ceiling.
3. Primed again...
4. Applied yet MORE texture to cover a few "places."
5. Primed over texture AGAIN!
Tomorrow my kitchen will be awash with beautiful color!
Here's what we did to get to this point....
1. Primed the walls and ceiling.
2. Textured the walls and ceiling.
3. Primed again...
4. Applied yet MORE texture to cover a few "places."
5. Primed over texture AGAIN!
Tomorrow my kitchen will be awash with beautiful color!
Saturday, May 29, 2010
Wednesday, May 26, 2010
I'm priming the kitchen today!
I'm thrilled to report that I am PRIMING the kitchen walls and ceiling today!!!
Wow... sure looks a whole lot better without stripes and dots!
Can't wait to put color on the walls.... but... will have to texture first.
Wow... sure looks a whole lot better without stripes and dots!
Can't wait to put color on the walls.... but... will have to texture first.
Tuesday, May 25, 2010
Kitchen ready for priming...
Got the walls & ceiling all sanded down. I thought that I would texture first then prime... but after googling discussions on this subject, I've decided to:
Prime
Texture
Prime
Then finish with 2 coats of paint.
And now... back to work!
Prime
Texture
Prime
Then finish with 2 coats of paint.
And now... back to work!
Saturday, May 22, 2010
Getting ready to texture the kitchen...
I'm getting ready to texture the kitchen!
Rich put up plastic sheeting over the doorways and windows. I'll be using wide painter's tape to cover all the outlets, light switches, and can lights.
Still thinking about colors for the kitchen...
Have pushed the cabinet install out to 6/7... but... will be done by my birthday!
Still thinking about colors for the kitchen...
Have pushed the cabinet install out to 6/7... but... will be done by my birthday!
Tuesday, May 18, 2010
Kitchen update 5/18/10
I'm very pleased to announce that the main kitchen area is all sanded and ready for texture!
And... I'm almost done sanding the breakfast nook.
Tuesday, May 11, 2010
Breakfast Nook...
Well, I'm off to spread some more mud way up at the peak of the cathedral ceiling of the breakfast nook. Up the tall ladder I go with mud pan & mud spreader thingy.
NOT looking forward to sanding up there...
Saturday, May 01, 2010
Kitchen progress...
I'm sanding the kitchen ceiling this morning. I'd post pics... but it doesn't really look like much... yet!
Wednesday, April 28, 2010
Sore muscles...
Worked most of the day sanding drywall in the kitchen. Boy am I sore tonight!!!
Now... got my feet up on a pillow while I look at color scheme books!
I've got all stainless appliances and black soapstone for counters/island... so I'm going to go with warm, rich, earthy colors.
Can't wait till I can put paint on the walls!
Cabinets... mid-May....
Tuesday, April 13, 2010
Kitchen cabinets to be installed
Heard from our cabinet maker... our cabinets are just about ready!
I picked the install date of 5/13... mid-May!
As soon as I'm done preparing Taxes... I'll be finishing the walls/ceiling in the kitchen!
Rich is working on the Master bathroom... doing plumbing and creating a platform for the antique bathtub.
Saturday, March 13, 2010
Wow... time flies!
I can't believe that it's been almost a month since my last post!!!!
We've been putting up sheetrock and mudding...
Rich has switched gears a bit and put on his "plumbing" hat for the master bathroom. He's in the midst of running water & sewer lines for that area.
The main sewer line for the master bathroom (on the 2nd floor) will run down the north wall corner of the living room. So, once that's done... we'll be able to sheetrock the Living Room!
The water lines will be coming up thru that same section and running into the ceiling of the Family room... once that's done... we'll be able to sheetrock the Family Room!
I'm happy to report... honestly... that mudding is going easier for me and I can now envision myself finishing the house!
I promise to take pictures today... and some video!!! Will update this post later tonight.
Wednesday, February 17, 2010
The Office... progress
Rich and Matthew continue to work in the Office by night... hanging sheetrock.
The Ceiling is up and the Walls are started. Two walls are up!
I spent the afternoon working on preparing the kitchen for primer. My work goes like this... mud... sand... mud... sand... mud... sand... Off I go!
Sunday, February 07, 2010
The Office...
Sheetrocking continues....
Big changes! What a difference it makes to have the sheetrock up! I can't believe how much brighter it is in the back hall.
The Office
Worked on the Office yesterday. Ceiling is all sheetrocked. Began the west wall but didn't get much farther than that.
While Rich & Matt installed sheetrock, I worked on taping the back hall.
Saturday, February 06, 2010
Back Hall progress....
I ended needing to devote quite a bit of time to my business this week... so didn't get the kitchen painted... sigh...
The house is feeling better and better! It was so awesome to come downstairs this morning into the back hall... with walls and a ceiling!!!! Very strange that the ceilings actually feel taller now with ceiling board on them.
Back Hall
So the back hall and ceiling have sheetrock!
Office
Today the goal is to put up ceiling board and get as far as possible on the walls!
Taping
I taped the back hall and closet yesterday... oh my gosh the closet... it's going to be a challenge finishing walls in there... I did not like it.... very claustrophobic!
Saturday, January 30, 2010
Pantry-finished wallboarding and...
Friday was a productive day. We feel as though we made some good progress! Here's a little summary. Sorry no pics or video. I'm borrowing Rich's computer because my Macbook is down... sigh...
We finished putting up the wallboard in the Pantry. It's all taped and ready for mudding.
Kitchen
I continued to work on mudding. Mostly yesterday I sanded the ceiling. It's official... my skin does NOT like sheetrock dust. I've got the red bumps today to prove it. Will have to protect my skin... maybe buy a special suit.
Breakfast Nook
Almost done... a few more sheets of sheetrock to go... of course... in the most difficult of places... the cathedral ceiling!
Tuesday, January 26, 2010
Monday, January 25, 2010
Graying all over!
I've just finished work for the day in the kitchen. Made some awesome progress...mudding & sanding!
Oh my gosh, you should see me! My hair is no longer golden light brown... but is GRAY! I'm covered in drywall dust!
I feel really good about how work went today. Guess that I'm getting into the groove with my "Mud Artiste" hat on!
But seriously... tomorrow I will dawn a bandana on my head!
A Video of How To Apply Mud to Finish your Sheetrock Walls
This is what I'm up to NOW!
Here's a video of how to get your walls ready for primer! Mud... Mud.. Mud..
Video: Tape & Mud Walls
Our Kitchen has walls!
We've been working hard... I mean... with great determination!
KITCHEN
Rich and our oldest son Matthew finished putting up the wallboard in the kitchen on Saturday night. YEAH!!!! BREAKFAST NOOK
However... the adjoining breakfast nook is still without walls/ceiling board. It's going to be a little tricky to finish because of the cathedral ceiling. We hope to get that done tonight!!!MUD
Today, I will continue mudding & sanding the ceiling & walls in the kitchen. Can't wait to get to the priming stage!!!!And...
I made a video to share with you so that you could see our progress... but alas... my macbook didn't like that last software update... and is... well... incapacitated right now... sadly... Can't post any more pics/video until I figure out how to fix it! Sorry!
Friday, January 22, 2010
More sheetrocking going up in the kitchen
SHEETROCK WALLS - KITCHEN
Well the kitchen is really taking shape!Rich and his unwilling teenage helper (our older, almost 16 year old son) are putting up the walls today!
It's looking pretty good!
WARNING: MUD ARTISTE at work!
I'm doing a 2nd coat of mud in the dining room.... mudding... sanding... I AM a self-proclaimed MUD ARTISTE!!! I AM!!!!
Tuesday, January 19, 2010
Celebrating each step....
Monday, January 18, 2010
Kitchen Ceiling.. Mud begins
Saturday, January 16, 2010
Kitchen Progress!
KITCHEN...
Rich ran the wiring for the Vent Hood this morning... then the rest of the day was dedicated to putting up ceiling board in the kitchen.I am very... extremely... happy to report that: We have a ceiling in the kitchen!!!!
MUD...
While the guys worked in the kitchen... I did some mud work in the dining room. It actually went really good today! Having the mud the consistency of sour cream really makes a huge difference in how smooth you can apply it!
I'm finally starting to feel more comfortable with it!!! Which is a good thing... because I have LOTS & LOTS of mud work yet to do!
Color Scheme...
Monday, January 11, 2010
Taping & Mudding... Mudding & Taping...
I worked in the boys' bathroom today putting on another coat of mud.
On Saturday I finished taping the front hall & tonight I began taping the kitchen.
I'm afraid that is going to be my life for a while yet....
I'm done for the day now.
Saturday, January 09, 2010
Friday, January 08, 2010
Houston, cabinets are a GO... I repeat...
Got the final drawing of the cabinets!
Way cool!
They will be Oak with Red Oak stain. I'm going with a simple look for the doors to go with my theme of Antique Mission for the whole house.
I've decided on Red Oak stain because we love antique furniture... so whatever we pick up will on future antique adventures will "go" with the kitchen!
OK,,, so let's get to work now!
Saturday, January 02, 2010
The Cabinet Maker is coming tomorrow!
Heard from our cabinet maker today. He's coming tomorrow for final measurements!
Wednesday, December 09, 2009
I'm dreaming of a white Christmas...
It's Christmas time! I love this time of year!
I'm dreaming of decorating my new house... next year...
And of cooking Christmas goodies to share.. next year...
And... of Christmas dinner in the dining room... next year...
Maybe even a Christmas party... next year!
But until then, the work continues! Rich is out getting 2x4s to prepare the walls for wallboard in the kitchen.
The dining room is all sheetrocked. And the foyer has quite a bit done!
Today I've been taping wallboard joints... and dreaming... of Christmases yet to come!
OK.. .enough blogging... back to work!
Tuesday, December 01, 2009
Walls in the front entryway
Inside the house continues to take shape! More walls!
Over the long weekend Rich & Matthew put up wallboard in the front entryway.
Friday, November 13, 2009
I've escaped for a short break...
Wait... Do you hear that noise? NO?
It is the sound of progress!!!!
It's Richard, and our sons, Matt, & Aaron hanging sheetrock in the dining room! Yeeeehaa!
And me? I've covered in mud... Been slinging mud in the boys' bathroom!
Wednesday, November 11, 2009
Caution... Mud Artiste at Work!
Finish work begins in the Boys' Bathroom
The Boys' bathroom is being mudded... butt joints are disappearing, corners seamed, ceiling blended nicely... Caution... the Mud Artiste is at work!Much work to still do...
I'd post a photo but my camera is being fixed!
Guest Bathroom Update
The Guest Bathroom now has a toilet paper holder... and a towel rack. The mirror has been installed and a 4-light light bar illuminates the bathroom nicely! This is the main bathroom right now... but it will be awesome when I finish the boys' bathroom... because even now... one bathroom is not enough!
Friday, November 06, 2009
Ah... running water in the Vanity Sink!
Rich has been working on some electrical work on the 1st floor porch. The outlets for the Christmas lights is now working!!!! Time to pick up some more LED Christmas lights!
Guest Bathroom Update
The vanity in the guest bathroom has just been sitting there for a couple weeks. Well today we picked up the couple parts that we needed to do the drain. So... as of tonight... we now have one sink with running water in the vanity.
I ordered a pretty shower curtain from Overstock.com. I chose the Morocco one, isn't it pretty?
We also installed the 4 globe light bar and went to install the bevelled edge mirror... but found that it had a chip in one of the corners... I'm so disappointed... BUT... being able to brush my teeth with running water in the vanity sink... puts a smile on my face!
I'll tell you, I've come to truly appreciate life's simple pleasures... like toilets... hot showers... and now... running water in the vanity sink! Wooohooo!!!
The Boys' Bathroom
Mudding... I got quite a bit done today!!! Tomorrow... more mud in corner joints & ceiling joints...
Wayne, if you're out there.... I'm dreaming of cabinets... installed before Christmas!!!
Wednesday, October 21, 2009
Guest bathroom almost complete... and my spotted self...
Today our bamboo stair treads were delivered... and late this afternoon the balusters arrived!
I'm taking a bit of a house building... I mean... finishing... break. After stressing out over the soapstone delivery... I broke out in a massive hive attach... so bad... that I looked like a monster with puffy eyes and mitts for hands. My mother made me promise that I would go to the doctor....
Pushing myself forward... like a spotted lizard with bulging eyes... swollen all over... but full of determination... I finished texturing and painting the guest bathroom!!!
Took my swollen, red-purple, spotted self to the doctor on Monday. The doctor said... whoa... you have hives! 3 medications and two days later... I'm finally looking somewhat normal... well... except for my spotted reddish hands.
Some of the young women from church came by to see me... they were doing a fundraiser... and exclaimed... as they backed away... WHAT HAPPENED TO YOU?
So as I wait for my skin to heal... I'm planning my next attack... the BOY'S bathroom!
Saturday, October 17, 2009
Painting the Guest Bathroom!
Wow... does this Wagner Power Roller Max work slick! I had to put it on slow speed to keep up with it... no slacking... got to move fast!!!!
Got the painting started! Here's a little video to share with you!
It's time to finish! Bye for now!
Wednesday, October 14, 2009
Finished priming the walls in the Guest Bathroom
I'm slowly making progress in the Guest Bathroom!!!
I finished priming the walls/ceiling today... even put together my new texture gun and gave it a go!!!
It took a while to cover everything that I didn't want texturized... light switches... lights... outlets... heating vents... the tub/shower... then... I didn't have any light to work by!!!
Well, actually... I made due with one light...
First, I practiced on some odd pieces of sheetrock... then I started in on the toilet area.
Works great!!! Next... need LIGHTING... and finish the texturing of walls and ceiling!
Thursday, October 08, 2009
The Soapstone Arrives!
Our soapstone is delivered... thanks to the careful forklift maneuvers and Larry the delivery guy running his lift gate!
Man did I stress out over this delivery!!! Why didn't I take this stuff? I really really really needed it!!!
Wednesday, October 07, 2009
Soapstone is being delivered... Thanks Nash!
Tomorrow our soapstone will be delivered!
A big thank you to Nash of High Plains Roofing for helping us get these heavy pieces off the truck!
Nash installed our gorgeous antique bronze metal roofing... and the beautiful country red siding! Ok... let's just say that he's awesome! We've so enjoyed working with him!
Got my texture gun yesterday!
I got a texture gun yesterday! I'm trying to decide if I should prime the walls first... or texture first... if you have any strong oppinions... please post a comment!
Well, I'll get it figured out!
Here's a photo of the house!
Monday, October 05, 2009
Soapstone is heavy...
They called to say that they have NO WAY to get it off the truck... and that we're responsible for that part... umm... OK... ya... right...
Dealing with this issue today!
10/7/09 UPDATE ON SOAPSTONE SHIPPING ISSUE:
Our soapstone folks, M. Teixeira Soapstone of Denver, have been awesome to work with! I didn't realize that I'd need to have a fork lift to get it off the truck because of the size of our slabs!
Texture Sprayer...
Tracked down a texture sprayer that has good reviews. It's available at Home Depot. Will be going to get it tomorrow.
Saturday, October 03, 2009
Texturing walls in Guest Bathroom
I started to texture the walls in the guest bathroom using a roller... ummm... I think that I'm going to track down or buy a hopper gun... and spray it on... will be much easier!
Just posted a great video in the drywall reference section on how to use a hopper gun over there... on the right!
The work moves forward... but for now... bed!
Friday, October 02, 2009
Finishing walls...
Anyone in this profession... deserves every penny... dollar... bucket of dollars that they earn!
I now dub myself... Mud Artist... there... I feel better now.
Update: Washing machine was just installed with brand new stainless steel lifetime warranty hoses. Yeah!!! Onto clothes washing!
Thursday, October 01, 2009
Final mudding & sanding of the guest bathroom?
Well, I'm totally wiped from moving yesterday... and boxes are everywhere...
But, I am a woman... on a mission to finish the walls in the guest bathroom! So!
Back to work I go... a sanding... a mudding... and hopefully... a texturing! Whooohoo!
Tuesday, September 29, 2009
Reporting from the dust cloud within the guest bathroom...
The work continues on perfecting the walls in the guest bathroom.
This is my first time working with mud. I've found out the hard way that "less is more..."
I've decided to lightly texture the walls using a roller.
Back to my dust cloud for now.... soon... drywall primer...
Thursday, September 24, 2009
Finishing walls in the guest bathroom... mud work part 1
Got the tiling job all done the other day... now I want to finish the walls!
I've picked a sage green paint... so better GET TO WORK!
I know... I know... I'm doing things a little backwards... but at least now... if we want... we CAN install the toilet!
Tuesday, September 22, 2009
Grout done in Guest Bathroom!
Just finished grouting the tile in the guest bathroom! Yeah!!! It took 3 buckets of Mapei OptiColor to do the whole bathroom.
I was a little scared to get going on the grouting... it was my first time. But honestly, grouting was the easiest part of the tile whole project!
It looks really nice!
Now... to finish the walls! I had to switch gears and get the tile done so that we could install a toilet.
Back to mudding...
Monday, September 21, 2009
Grout almost done in Guest bathroom!
Wow... I've been putting off doing the Epoxy Grout. OK... I was scared based on what I've read and what my Lowes sales people shared with me.
The most important thing when doing epoxy grout is to make sure that you get all the epoxy off the tiles.
I just applied 2 buckets of Mapei OptiColor epoxy grout. I think that hardest part is the clean up.
The great thing about epoxy grout is that it's waterproof... and the grout color stays.
If you're about to do Mapei OptiColor epoxy grout, you may find this Mapei video helpful... I did!
Saturday, September 19, 2009
Saturday... 9/19/09
-Door installed to storage space under porch! Under porch storage
-Extra thinset cleared from between tiles in preparation for grouting.
-Some things moved to new house including 2 cabinets from kitchen.
-Basement organized so that we can move the rest of our things from the rental this week.
I had hoped to get to grouting today, but looks like that's on for Monday!
Friday, September 18, 2009
Thursday, September 17, 2009
Guest bathroom tile update
This is my very first time doing tile. It's been a great adventure! Lots more rooms to tile!
Just got to thinset down the last little bit of tile... then onto GROUT!
Tuesday, September 15, 2009
Testing the Gas Line for Leaks
The black piping for the gas line has been installed. Yesterday I chased down parts to create a gas pressure test. (We found this forum answer to be very helpful.)
Today Rich completed the install for an outside gas line to the outside grill on the future deck.
We made sure all the valves were closed... and pressured the line to 15 psi. After seeing that it held pressure... we then tested each joint with "Gas Leak Detection Solution."
Everything is perfect!!!
Tomorrow MDU (our local gas utility) will bring the gas line from the property line over to the house and install the gas meter.
More tomorrow!
Saturday, September 12, 2009
The Gas Line takes shape
Front Door installed!
We ordered this beautiful leaded glass door over a year ago. And it sat waiting to be installed while we did other more pressing work... like installing windows, electricity, plumbing... sheetrock...
The house has been enclosed for quite a while with a door on the enclosed front porch... but then we had just a big opening into the house. But NO LONGER!
We now have our beautiful front door installed!
It has leaded glass and oak trim (to be stained). It's very pretty!
Rich is installing the handle now...
Thursday, September 10, 2009
Saturday, September 05, 2009
Tile Laying has begun in Guest Bathroom!
It took a while to decide on the tile layout, but once I did... I marked it out, then with my nephew's help... started laying tile!
Once I put down a few tiles, I started to get into a "groove."
**Note to myself**
Always start in the back corner... and work toward a door!
I'm a little more than half way done! Will get back to it on Monday.
Wednesday, September 02, 2009
Dreaming of a toilet...
Today I plan on laying out tile in the guest bathroom. Actually, I got it started last night...
I will get starting laying tile today! I have to check to see how long it needs to set before grouting.
I'm feeling a little leery of doing the grout. Back when I knew NOTHING about tiling except the dream of having tiled bathrooms... the Lowes salesman... based on what I wanted... and because it's a bathroom install... helped me pick epoxy grout. From everything I've read, I'm going to have to be very very careful with it!
If anyone has experience working with epoxy grout, please DO leave your pearls of wisdom in comments!
Anyway, I'm so looking forward to having a toilet here! My plan is be able to have that in place this weekend!
Laying the Ditra was quite a bit of work... I was so tired when toward the end. But, it's done!
Note to myself on Ditra installation:
-Have a clip hand to hold rolled Ditra.
-Have Ditra pieces pre-cut.
-Have other bathrooms prepped with cut Ditra in case of extra thinset.
-Start first thing in the morning!
Tuesday, September 01, 2009
Ditra installed in Guest Bathroom!
Well... I put it off... and I put it off...
But finally I decided that I've got to have a toilet installed in this house!!! So, with that motivation in mind...
I got to it!
You should have seen me all covered in thin set and sweat! What a workout, I'll tell you!
Guest bathroom now has ditra installed!!! Next step is to decide the tile layout.
Subscribe to:
Posts (Atom)